Executing a report
These are instructions for executing reports. The available functionality is different for each report.
In all cases, the data included in the reports includes information only for the Sage customer's aligned to your company.
Data for the reports is refreshed each evening and is not provided in real time.
Accessing reports
All reports are accessed by selecting the Reporting center tab on the navigation bar.
The report names display on the sub-menu below this.
Clicking a report name will display that report's Variable Entry screen.
The exception to this is the Customer Data report which automatically starts the query for all the customers aligned to your company.
Some reports can take a considerable time to return data and there is not always an indication that it is working.
Be patient after clicking the report name and restrain from clicking the report name again as this can restart the query and delay the results further.
Only one report can be displayed at time; therefore, if you have a report displayed and click on a report name on the sub-menu, the displayed report will close the new report (Variable Entry) will display.
To execute most reports you must enter filter values on the Variable Entry screen.
Required fields are identified with an asterisk *. Once your criteria is entered, click
OK.
If you leave the Reporting Center idle, it may time out. When this occurs, the sub-menu of report names will disappear and require you to log back onto the Sage Portal.
Closing a displayed report
To close a displayed report, click the name of another report on the sub-menu or any other tab on the main menu.
Initial filtering of report data
Most reports display a Variable Entry screen prior to running the query which allows you to narrow down the data included in the output.
You should select this filter information carefully in order to reduce the query time as well as the data returned. Typical fields for
filtering include: Date Ranges, Product Types, Plan Types, etc.
Entering filter values in the Variable Entry screen fields
Required fields
are identified with an asterisk (*).
Most all fields in the
Variable Entry screen have pop-up selection boxes which display the
options available for that field. Generally you may select one or more
values from this pop-up list.
Date range fields allow you to select a specific date from a list or you can type in the Date Ranges.
To use a Date range pop-up selection box:
- Click the square pop-up box icon in the
Date range field of the Variable Entry screen.
- In the From: * field, enter the beginning date using the format mm/dd/yyyy.
- In the To: * field, enter the ending date using the format mm/dd/yyyy.
- Click OK to continue or Cancel to discard your entries.
Note: Typing in the dates is faster than using the date selection option as there are too many dates in the list.
To use the
Select Values pop-up list box on the Variable Entry screen:
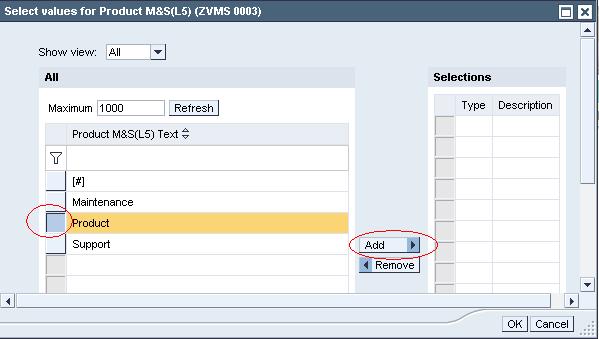
- Click the square pop-up box icon in a field of the Variable Entry screen (see below).
- The possible values for this field display on the left.
Click on each value
you want to include in the filter (it will turn dark yellow).
- Click the Add button in the middle of the screen to move it/them to the right side.
- To remove a value from the right side, click on it and then click the Remove button.
- Click OK to save your selections.
Using a wildcard search in the Select Values List
If there many values in a Select values list box, you can use the filter option with a wildcard (*) to locate the value(s) you need.
To use the Filter option:
- Click into the blank top line of the Select Values list (displays a funnel icon in the left most column).
- Enter the exact value or use a wildcard character (*) before and/or after the characters for which you are searching (for example: *payables).
- Press Enter to execute the wildcard search.
Saving a frequently used set of Variable Entry filter values
If you frequently use the same values on a particular report's Variable entry screen, you can save them for future use.
To do this:
- Launch the report from the sub-menu bar.
- Enter the desired values in the Variable entry fields.
- Click the Save button.
- Enter the name for this set of variants in the Description field.
- To have this variant only display for you (the logged on user), check the box for
"Save As User Variant" (which is checked by default).
- Click OK to save or Cancel to discard.
To save a slightly different version of this variant, click the
Save As button and enter a different name.
To save changes over an existing variant you have selected, click the
Save button again.
To use a saved variant:
- Select the variant name from the Available variants drop list.
- Optional: make any changes you wish to the saved values.
- Click the OK button to execute the report.
To Delete a saved variant:
- Select the variant name from the Available variants drop list.
- Click the Delete button.
See also:Basic report navigation
How to enter date ranges